- How To Do an Emergency Tooth Extraction
- How To Do an Inferior Alveolar Nerve Block
- How To Do an Infraorbital Nerve Block, Intraoral
- How To Do a Mental Nerve Block
- How To Do a Supraperiosteal Infiltration
- How To Drain a Tooth Abscess
- How To Reduce a Mandibular Dislocation
- How To Replace and Splint an Avulsed Tooth
Tooth extraction is performed using manual dental instruments, to remove nonviable, nonsalvageable teeth. Adequate anesthesia is important. Postprocedure dry socket is to be prevented.
Topic Resources

Even when indicated, emergency tooth extraction is typically performed by a dentist except when a dental professional is not available (eg, in remote areas or some emergency situations).
Indications for an Emergency Tooth Extraction
Significant infection in a nonviable, nonsalvageable tooth
Marked tooth mobility (eg, due to infection, periodontal disease, trauma) posing a risk of aspiration
A nonsalvageable tooth may result from tooth decay, pulp necrosis, bone loss secondary to periodontal disease, or trauma that causes tooth ischemia or fracture.
Contraindications to an Emergency Tooth Extraction
Absolute contraindications
Site has been previously heavily irradiated (extraction could precipitate osteoradionecrosis)
Site is in proximity to an area of infection or malignancy (extraction may spread the disease)
Adjacent structure is fractured (the tooth may be stabilizing the fracture)
Relative contraindications
Patients receiving injectable bisphosphonate or RANK-ligand (receptor activator of nuclear factor-kappa B–ligand) inhibitor therapy (eg, for cancer): Extraction could precipitate osteonecrosis.
Coagulopathy*: When feasible, correct prior to procedure.
Pregnancy: Many guidelines state that patients can be safely treated throughout the entirety of their pregnancy. Truly elective treatment should ideally be deferred during the first trimester to prevent potential harm to the developing child (1).
Oral bisphosphonates (eg, for osteoporosis) have markedly lower risk of osteonecrosis than injectable bisphosphonates (2). However, a low risk remains, especially in the mandible, in older patients, in those receiving chemotherapy or corticosteroid treatment, and in those with multiple systemic diseases.
* Therapeutic anticoagulation (eg, for pulmonary embolism) increases the risk of bleeding with tooth extraction, but this must be balanced against the increased risk of thrombosis (eg, stroke) if anticoagulation is reversed. Discuss any contemplated reversal with the clinician managing the patient's anticoagulation and then with the patient (3–5).
Contraindications references
1. Bao J, Huang X, Wang L, He Y, Rasubala L, Ren YF. Clinical practice guidelines for oral health care during pregnancy: a systematic evaluation and summary recommendations for general dental practitioners. Quintessence Int. 2022;53(4):362-373. doi:10.3290/j.qi.b2644863
2. Ruggiero SL, Dodson TB, Aghaloo T, Carlson ER, Ward BB, Kademani D. American Association of Oral and Maxillofacial Surgeons' Position Paper on Medication-Related Osteonecrosis of the Jaws-2022 Update. J Oral Maxillofac Surg. 2022 May;80(5):920-943. doi: 10.1016/j.joms.2022.02.008
3. Kaplovitch E, Dounaevskaia V. Treatment in the dental practice of the patient receiving anticoagulation therapy. J Am Dent Assoc. 2019 Jul;150(7):602-608. doi: 10.1016/j.adaj.2019.02.011
4. Curtis J, Henderson DP, Zarghami M, Rashedi S, Bikdeli B. Management of antithrombotic therapy in patients undergoing dental procedures. J Thromb Haemost. 2025 Jan;23(1):47-72. doi: 10.1016/j.jtha.2024.09.022
5. Suresh V, Bishawi M, Manning MW, Patel C, Rogers J, Milano C, Schroder J, Daneshmand M, Powers D. Management of Patients With Left Ventricular Assist Devices Requiring Teeth Extraction: Is Halting Anticoagulation Appropriate? J Oral Maxillofac Surg. 2018 Sep;76(9):1859-1863. doi: 10.1016/j.joms.2017.10.022
Complications of an Emergency Tooth Extraction
Injury to nearby mucosa, teeth, maxilla (eg, maxillary tuberosity or sinus), or jaw (eg, fracture, temporomandibular joint [TMJ] injury) due to excessive or misdirected force
Perforation of the maxillary sinus during extraction of maxillary molars, or some premolars
Nerve injury resulting in sensory changes (eg, numbness, protracted pain, hypersensitivity, loss of taste)
Loss of tooth or tooth fragment in maxillary sinus
Aspiration of tooth
Equipment for an Emergency Tooth Extraction
Dental chair, straight chair with head support, or stretcher
Light source for intraoral illumination
Nonsterile gloves
Mask and safety glasses, or face shield
Gauze pads
Cotton-tipped applicators
Dental mirror or tongue blade
Suction, preferably narrow tip (3- to 5-mm), not Yankauer
Rubber bite block for lower teeth (to help protect the TMJ by preventing excessive pressure on the mandible—pediatric size is usually adequate for both children and adults)
Retractors (eg, Minnesota cheek retractor, Weider tongue retractor)
Elevators—#9 Molt: periosteal elevator; #301 (narrow) or #34 (wide): straight elevators; #92: bayonet elevator
Forceps—#150 or #150S (small): universal upper forceps; #151 or #151S (small): universal lower forceps
Minimal basic dental instruments include small periosteal elevator (Molt or Freer), #301 elevator, and universal forceps (#150 [upper], #151 [lower]).
Equipment to do local anesthesia
Topical anesthetic ointment* (eg, lidocaine 5%, benzocaine 20%)Topical anesthetic ointment* (eg, lidocaine 5%, benzocaine 20%)
Injectable local anesthetic such as lidocaine 2% with epinephrine† 1:100,000, or for longer duration anesthesia, bupivacaine 0.5% with epinephrine† 1:200,000 Injectable local anesthetic such as lidocaine 2% with epinephrine† 1:100,000, or for longer duration anesthesia, bupivacaine 0.5% with epinephrine† 1:200,000
Dental aspirating syringe (with narrow barrel and custom injectable anesthetic cartridges) or other narrow barrel syringe (eg, 3 mL) with locking hub
25- or 27-gauge needle: 2-cm long for supraperiosteal infiltration; 3-cm long for nerve blocks
* CAUTION: All topical anesthetic preparations are absorbed from mucosal surfaces, and toxicity may result when dose limits are exceeded. Ointments are easier to control than less-concentrated topical liquids and gels. Excess benzocaine rarely may cause methemoglobinemia.* CAUTION: All topical anesthetic preparations are absorbed from mucosal surfaces, and toxicity may result when dose limits are exceeded. Ointments are easier to control than less-concentrated topical liquids and gels. Excess benzocaine rarely may cause methemoglobinemia.
† Maximum dose of local anesthetics in adults: Lidocaine without epinephrine, 5 mg/kg with total maximum dose of 300 mg; lidocaine with epinephrine, 7 mg/kg with total maximum dose of 500 mg; bupivacaine without epinephrine, 2 mg/kg with total maximum dose of 175 mg. NOTE: A 1% solution (of any substance) represents 10 mg/mL (1 gm/100 mL). Epinephrine causes vasoconstriction, which prolongs the anesthetic effect; this is useful in well-vascularized tissues such as the oral mucosa. Patients with cardiac disease should receive only limited amounts of epinephrine (maximum 3.5 mL of solution containing 1:100,000 epinephrine); alternatively, use local anesthetic without epinephrine.† Maximum dose of local anesthetics in adults: Lidocaine without epinephrine, 5 mg/kg with total maximum dose of 300 mg; lidocaine with epinephrine, 7 mg/kg with total maximum dose of 500 mg; bupivacaine without epinephrine, 2 mg/kg with total maximum dose of 175 mg. NOTE: A 1% solution (of any substance) represents 10 mg/mL (1 gm/100 mL). Epinephrine causes vasoconstriction, which prolongs the anesthetic effect; this is useful in well-vascularized tissues such as the oral mucosa. Patients with cardiac disease should receive only limited amounts of epinephrine (maximum 3.5 mL of solution containing 1:100,000 epinephrine); alternatively, use local anesthetic without epinephrine.
Additional Considerations for an Emergency Tooth Extraction
If a tooth is being removed and perioral soft tissues also need to be repaired (eg, as is the case with a lip laceration), it is preferable to proceed from inside to outside (ie, removing tooth first, then repairing lip).
Some patients require pretreatment:
Antibiotic prophylaxis for endocarditis should be given to certain high-risk patientsprior to dental extraction (1, 2).
Sedation may be needed for patients unable to cooperate with the procedure.
Additional considerations references
1. Sollecito TP, Abt E, Lockhart PB, Truelove E, Paumier TM, Tracy SL, Tampi M, Beltrán-Aguilar ED, Frantsve-Hawley J. The use of prophylactic antibiotics prior to dental procedures in patients with prosthetic joints: Evidence-based clinical practice guideline for dental practitioners--a report of the American Dental Association Council on Scientific Affairs. J Am Dent Assoc. 2015 Jan;146(1):11-16.e8. doi: 10.1016/j.adaj.2014.11.012
2. Wilson WR, Gewitz M, Lockhart PB, et al; American Heart Association Young Hearts Rheumatic Fever, Endocarditis and Kawasaki Disease Committee of the Council on Lifelong Congenital Heart Disease and Heart Health in the Young; Council on Cardiovascular and Stroke Nursing; and the Council on Quality of Care and Outcomes Research. Prevention of Viridans Group Streptococcal Infective Endocarditis: A Scientific Statement From the American Heart Association. Circulation. 2021 May 18;143(20):e963-e978. doi: 10.1161/CIR.0000000000000969. Erratum in: Circulation. 2021 Aug 31;144(9):e192. doi: 10.1161/CIR.0000000000001012. Erratum in: Circulation. 2022 Apr 26;145(17):e868. doi: 10.1161/CIR.0000000000001066
Relevant Anatomy for an Emergency Tooth Extraction
The floor of the maxillary sinus can be very thin, and roots of teeth may abut, or possibly enter, the sinus.
The lateral wall of the maxilla is relatively thin. Thus, most maxillary teeth can be anesthetized by simple local infiltration over the apex (root tip) of the tooth, because the anesthetic solution readily diffuses through the thin lateral bone.
Inferior alveolar nerve: Obtain a radiograph to assess the proximity of lower molar roots to the inferior alveolar nerve to avoid inadvertent nerve injury.
Other dental nerves: To avoid nerve injury, avoid reflecting nearby mucosa (ie, lingual side of the mandible [lingual nerve], buccal side of the mandible in the premolar region [mental nerve]), and use caution reflecting mucosa above the maxillary canine/premolars (infraorbital nerve).
Temporomandibular joint (TMJ): Because excessive pressure on the mandible can injure the joint, support the mandible with one hand and use a bite block if available.
Positioning for an Emergency Tooth Extraction
Position the patient inclined, with the patient's head at the level of your elbows and the occiput supported.
For the lower jaw, use a semi-recumbent sitting position, making the lower occlusal plane roughly parallel to the floor when the mouth is open.
For the upper jaw, use a more supine position, making the upper occlusal plane roughly 60 to 90 degrees to the floor.
Turn the head and extend the neck such that the tooth is clearly visible and accessible: In general, turn the head slightly away to remove teeth on the side on which the operator is standing and slightly toward the operator for teeth on the opposite side. Keep the head facing forward for the front teeth.
Step-by-Step Description of an Emergency Tooth Extraction
Prior to the procedure, do periapical or panographic radiographs to evaluate the tooth in question, surrounding alveolar bone, and nearby structures.
Wear nonsterile gloves and a mask and safety glasses, or a face shield.
Provide local anesthesia
Consider whether sedation is needed.
For most lower teeth, do an inferior alveolar nerve block.
For most upper teeth, do supraperiosteal infiltration (an apical block).
If supplemental anesthesia is needed, do local infiltration (field block) around the tooth.
Extract the tooth
Place a partially unfolded 4 inch x 4 inch (10 cm x 10 cm) gauze pad posterior to the tooth to prevent inadvertent loss of the tooth in the throat; do this gently to prevent gagging.
The key steps are to
Release the cuff of gingiva attached to the tooth.
Gain initial tooth mobility using an elevator.
Further mobilize the tooth and then extract it using forceps.
Irrigate and, if needed, curette the socket.
Apply a gauze compression pad.
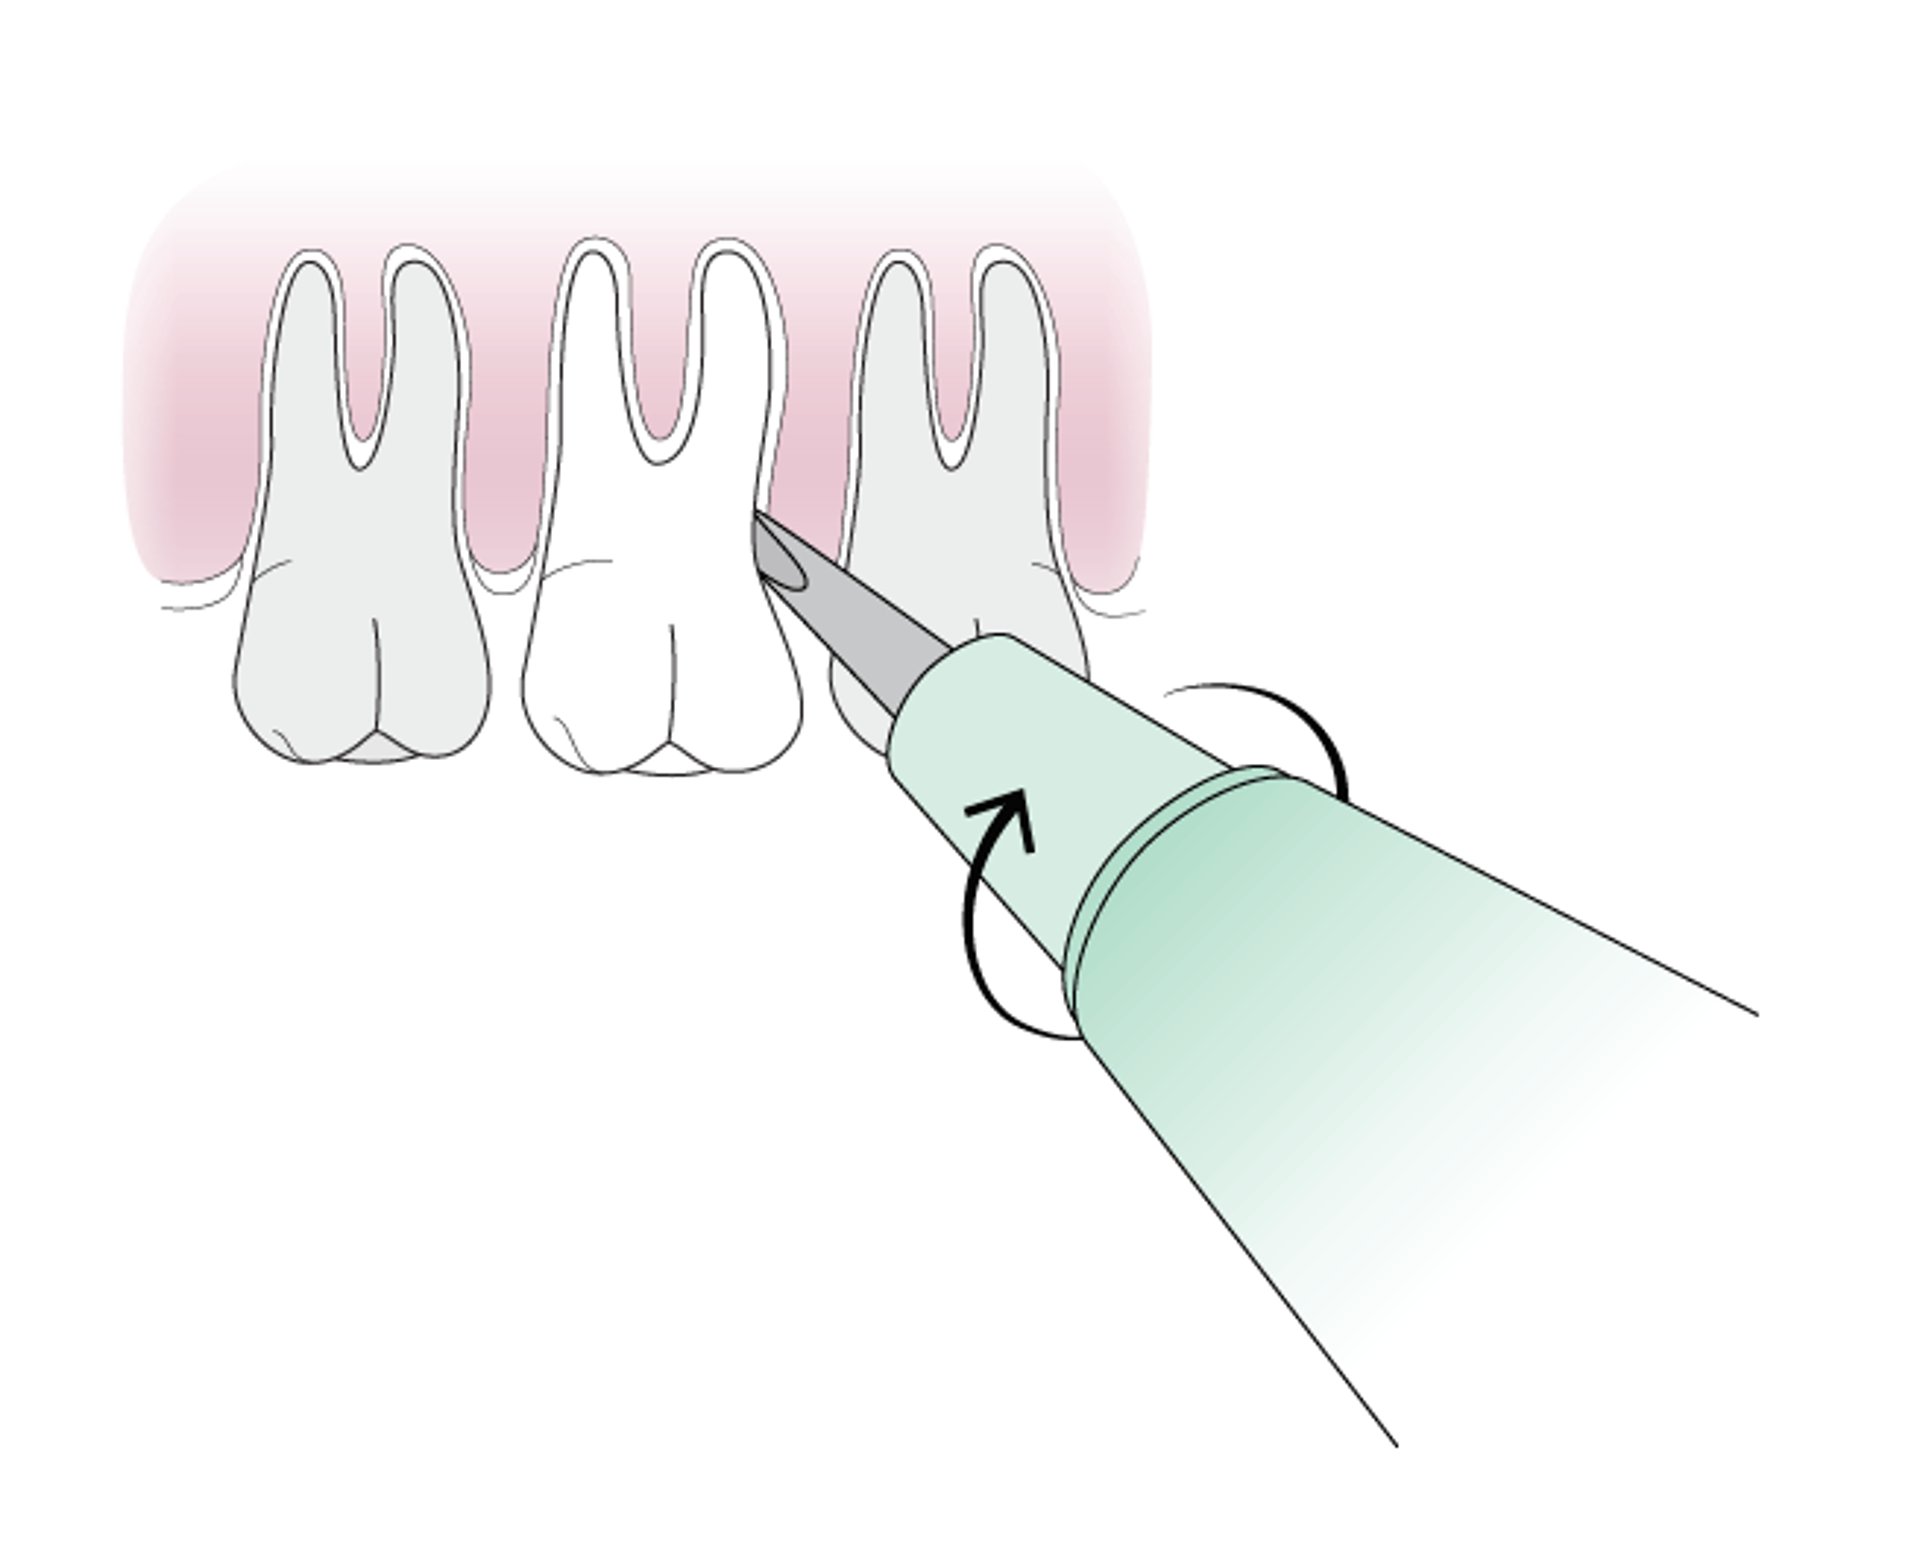
To release the cuff of gingiva, insert the pointed end of a #9 periosteal elevator between the gingival cuff and the tooth. Keep the point in contact with the root of the tooth and advance the elevator along the long axis toward the root tip; as it is inserted, the elevator gently reflects the gingival cuff away from the tooth. Do this circumferentially all the way around the tooth. Also, on the buccal side only, reflect the small triangular papilla of gingiva between the tooth to be removed and the tooth/teeth directly adjacent.
Gain initial tooth mobility using a straight elevator (eg, #301 or #92). Gently insert the elevator perpendicular to the tooth into the space between the tooth to be removed and the adjacent tooth. The elevator should be resting on the crest of the bone between the teeth. The elevator has 2 surfaces; the concave surface is the working side and should face the tooth being removed. One edge of the elevator is held against the alveolar bone between the teeth; this edge is kept in place and used as the fulcrum while the other edge is rotated toward the tooth being removed to mobilize the tooth and expand the socket. DO NOT use the adjacent tooth as a fulcrum. Mobilization with the straight elevator is usually first done anterior to the tooth being removed and then posterior to the tooth. The straight elevator also can be inserted vertically along the long axis of the tooth between the root and the socket, and rotated to further expand the socket. Do not use the alveolar bone on the palatal or lingual side of the tooth as a fulcrum. Use the elevator repeatedly in these ways to continue mobilizing the tooth prior to using the forceps.
Use of Dental Elevator
A dental elevator is inserted perpendicularly with the concave surface facing the tooth to be removed. The edge towards the root is held in place as a fulcrum while the other edge is rotated towards the tooth being removed. |

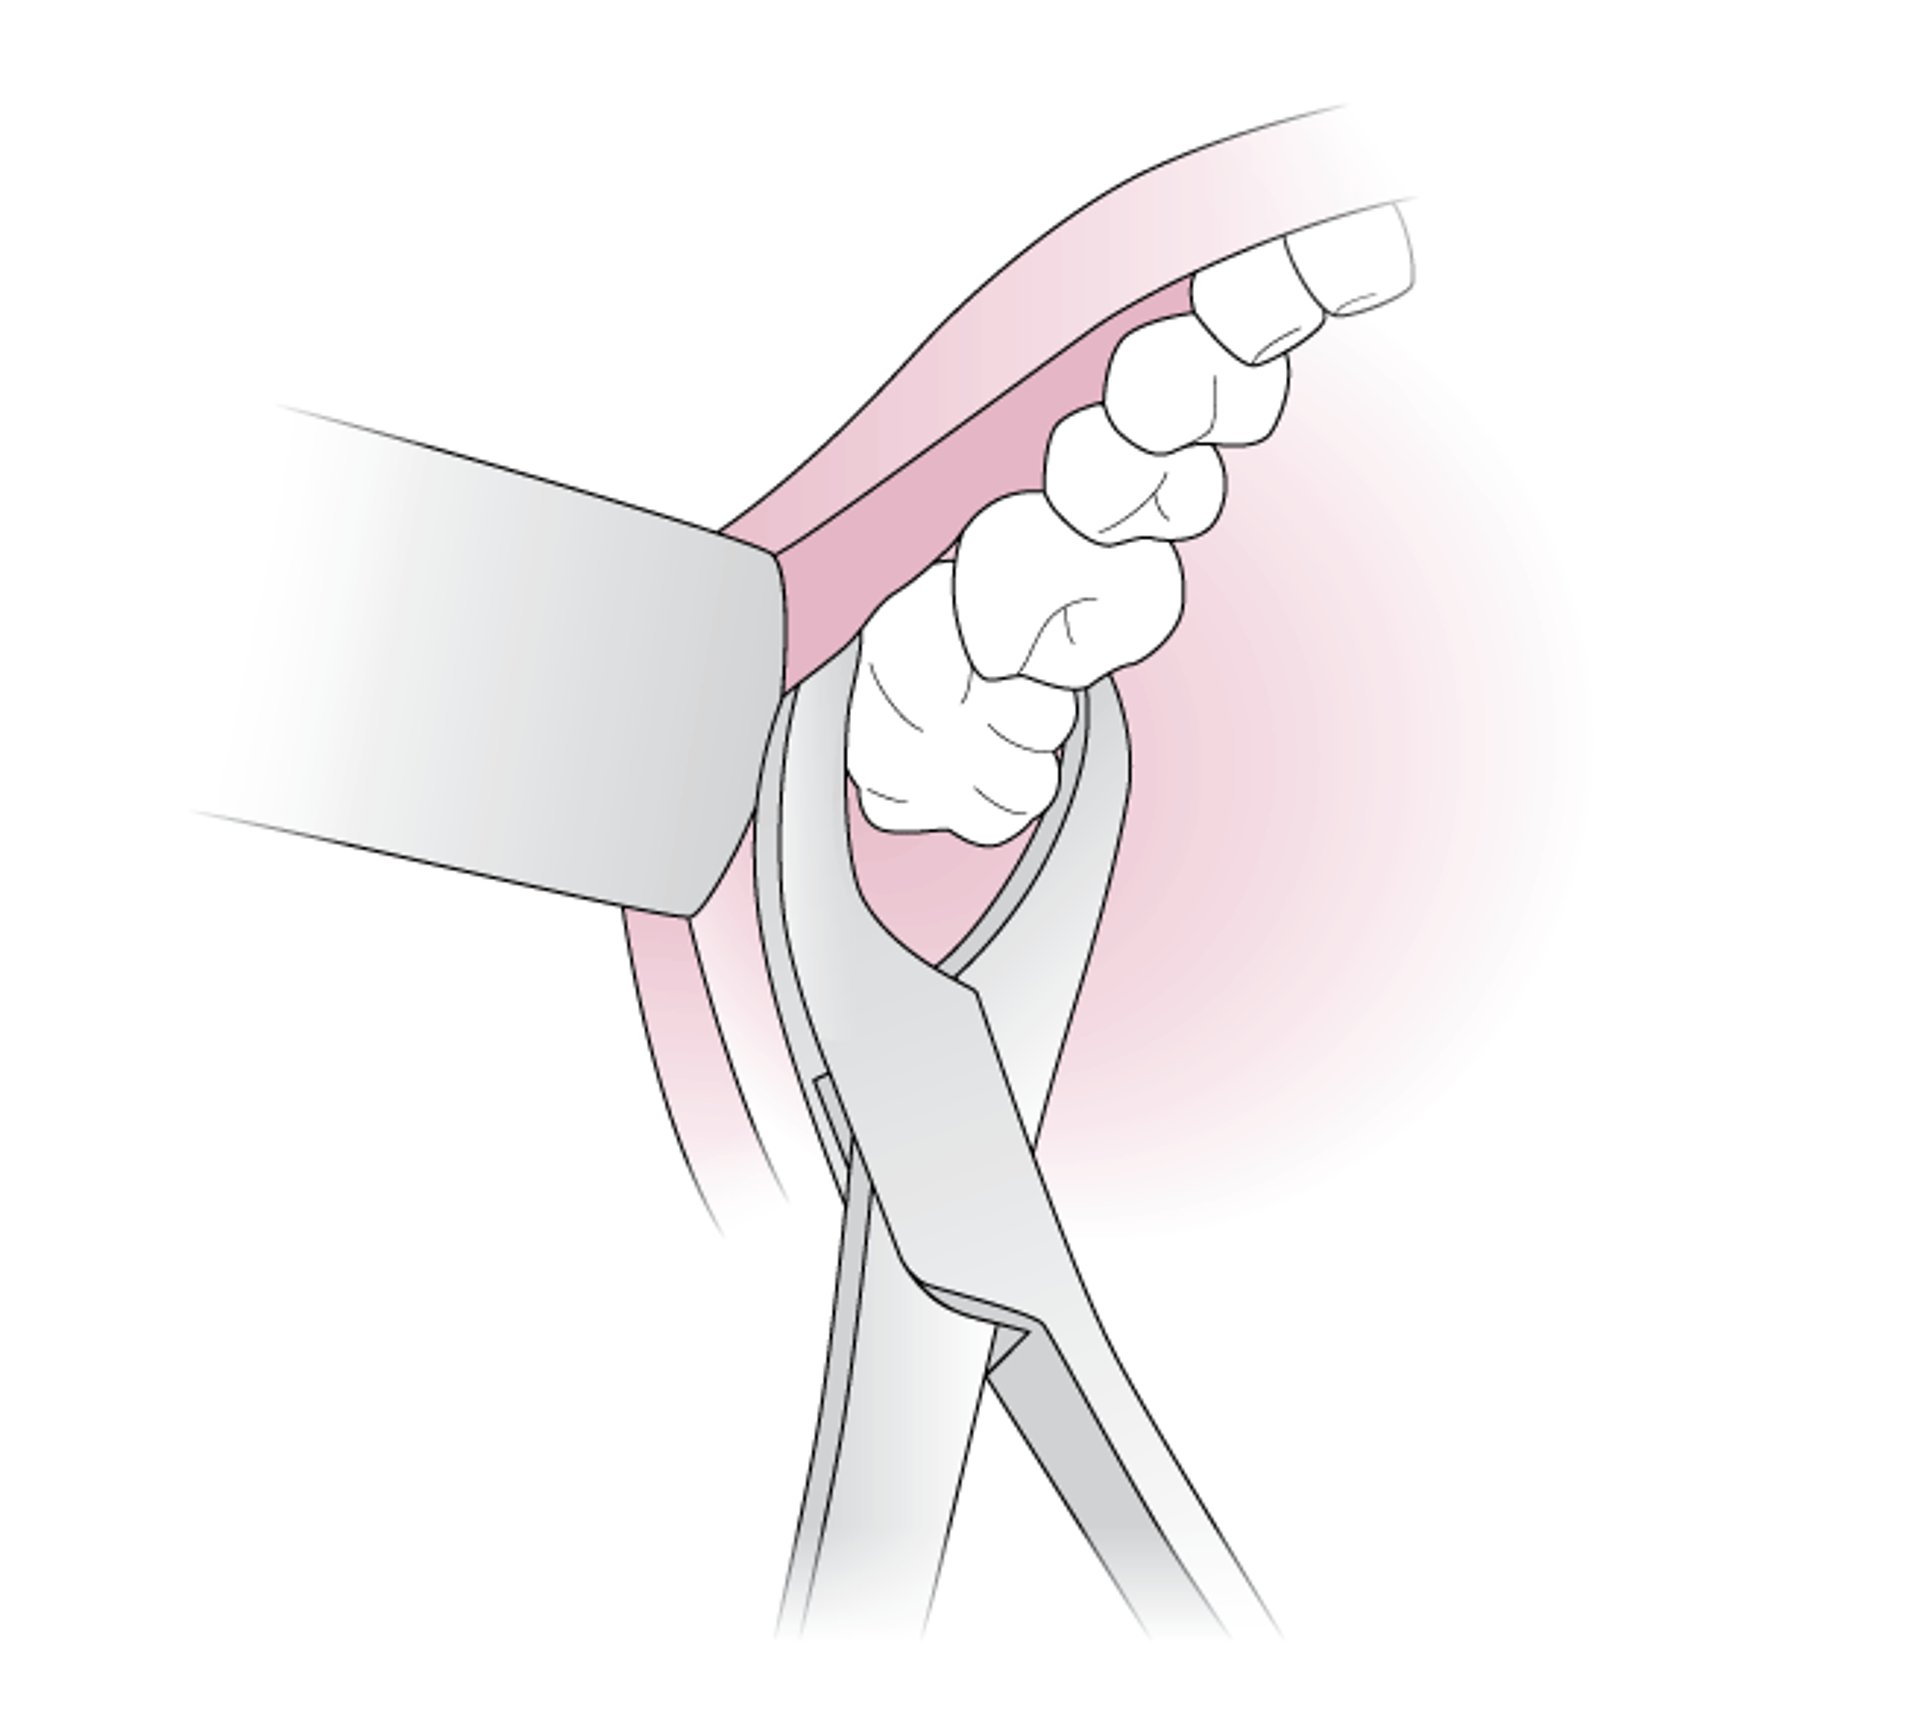
Further mobilize the tooth and then extract it using a forceps (#150 for upper teeth, #151 for lower teeth). Insert the beaks of the forceps beneath the loosened gingiva, along the root of the tooth and parallel to the long axis. Apply controlled apical (toward the tip of the root) force to slide the beaks along the root into the socket as far toward the apex as possible; this helps to further expand the socket. Then grasp the root firmly with the forceps and apply pressure apically, as though trying to push the tooth further into the socket. Place the thumb and forefinger of the opposite hand on both sides of the socket to support it and to help control forces and prevent unintended large fractures of the socket. Next, while maintaining apical pressure, rock the tooth in a side-to-side motion, continuing as needed to mobilize the tooth. This process is a controlled fracture of the socket. When the tooth is sufficiently mobile, remove it from the socket by gently pulling it straight out; do not begin pulling until the tooth is obviously loose and ready for extraction.
Use of Dental Forceps
The beaks of the dental forceps are inserted along the root of the tooth, parallel to the long axis. |

Irrigate the socket with sterile saline (chlorhexidine solution may be used if significant infection is present). Curette the socket only if chips of tooth, bone, or foreign debris are present. If the socket has been expanded, compress it using digital pressure to return it to its original shape.with sterile saline (chlorhexidine solution may be used if significant infection is present). Curette the socket only if chips of tooth, bone, or foreign debris are present. If the socket has been expanded, compress it using digital pressure to return it to its original shape.
Place a tightly rolled gauze pad 2 inch x 2 inch or 4 inch x 4 inch (5 cm x 5 cm or 10 cm x 10 cm), dampened with saline, directly over the socket (not on top of the adjacent teeth). Have the patient bite firmly on the pad to apply direct pressure on the socket continuously (without letting up even to speak) for 3 to 4 hours.
Aftercare for an Emergency Tooth Extraction
Have patient bite on a tightly folded, slightly dampened gauze pad for 3 to 4 hours after the extraction (initially changing pads every 30 to 60 minutes), to facilitate clot formation in the socket.
To prevent dry socket (ie, to retain the clot within the socket) instruct patient not to swish, spit, suck on anything, or drink from a straw for 24 hours. If possible, encourage the patient to abstain from smoking for a week (1, 2).
After 24 hours, the patient may begin gentle warm salt water rinses several times per day. However, vigorous swishing is prohibited for 1 week.
To help reduce swelling (which peaks on day 3 or 4), have the patient apply ice packs—30 minutes on, then 30 minutes off—for the first 24 hours and sleep with the head elevated for several days.
During the first 3 days, the diet may progress from liquids, to dairy, to soft foods. The patient should not chew on the affected side, and should avoid excessively hot or cold foods for 7 days.
Antibiotics are not indicated unless infection was present or a sinus was inadvertently penetrated.
Ice chips and NSAIDs (nonsteroidal anti-inflammatory drugs) are given for pain; narcotic analgesics (eg, acetaminophen with codeine, hydrocodone, or oxycodone) may be used if needed, depending on severity of extraction.Ice chips and NSAIDs (nonsteroidal anti-inflammatory drugs) are given for pain; narcotic analgesics (eg, acetaminophen with codeine, hydrocodone, or oxycodone) may be used if needed, depending on severity of extraction.
Arrange follow-up with an appropriate dentist in 1 to 2 days.
Advise the patient that intermittent light bleeding or oozing is common for several days and can be treated by biting on a gauze pad as described above.
Aftercare reference
1. Bortoluzzi MC, Capella DL, Barbieri T, Marchetti S, Dresch CP, Tirello C. Does smoking increase the incidence of postoperative complications in simple exodontia? Int Dent J. 2012 Apr;62(2):106-8. doi: 10.1111/j.1875-595X.2011.00098.x
2. Kuśnierek W, Brzezińska K, Nijakowski K, Surdacka A. Smoking as a Risk Factor for Dry Socket: A Systematic Review. Dent J (Basel). 2022;10(7):121. Published 2022 Jul 1. doi:10.3390/dj10070121
Warnings and Common Errors for an Emergency Tooth Extraction
Multirooted teeth (upper molars) with roots in close proximity to the sinus floor pose a significant risk of sinus complications if not surgically sectioned before removal (typically done by a maxillofacial surgeon).
Excessive and/or uncontrolled forces can fracture the alveolar bone, sinus, or adjacent teeth.
Do not use adjacent teeth or the alveolar bone on the palatal or lingual side of the teeth as a fulcrum.
Excess benzocaine exposure rarely may induce methemoglobinemia.Excess benzocaine exposure rarely may induce methemoglobinemia.
Tips and Tricks for an Emergency Tooth Extraction
Prevent dry socket by allowing establishment of a well-organized clot to form after extraction, with proper use of the gauze pad and avoidance of disturbing the clot. Emphasize to the patient that the gauze pad is intended to put direct pressure on the socket and not just soak up blood; the gauze pad must be tightly rolled, slightly damp, and small enough to fit in the space where the tooth was removed, so that it puts direct pressure on the socket itself. Also emphasize the importance of applying continuous pressure to the gauze pad as much as possible for the first 1 to 2 days when not eating, drinking, or sleeping. Vigorous rinsing or spitting should be avoided for several days, and smoking is prohibited for at least 1 week.
Positioning the patient so that the head is at the height of the operator's elbow—or slightly below it—can aid in visualization. This also allows the operator to keep arms and elbows next to the body, allowing better control of force.